Over the last weekend, I installed the Yaesu FTM-400XD mobile radio in my Jeep. First, the installation was much easier than I expected, as I was able to use the majority of my old installation (which was the FT-7900R). The only difference was placing the control head. Second, the new control software was as easy to use as CHIRP, so I was able to program it very fast. Third, the radio is extremely well-designed, and is an absolute pleasure to use.
The Installation
I bought the radio during the week, after arguing with myself between the FTM-100DR and the FTM-400XD. I finally went with the FTM-400XD because I really wanted the ability to use dual receive and cross-band repeat. The FTM-100DR cannot dual receive and it cannot cross-band repeat.
On Saturday, with the weather dipped low, I went outside and scoped the vehicle to determine how best to complete the installation. I was pleasantly surprised by the fact that the radio used the same MMB-36 mounting bracket, which meant the radio could go back underneath my driver's seat. To prepare the radio body, I just crimped on some Andersen Powerpole connectors (took all of five minutes). Then I installed it.
The control head was an issue. I checked a few Jeep Wrangler forums, and I saw three basic locations:
1. Above the rear view mirror. To do it, the operator turned the FTM-400 control head mount upside down to connect it. The FTM-400XD has an expanded GPS, and I'm not positive, but I think it added a big bump on the back of the control head, so you can't flip the mount anymore. Therefore, not an option.
2. Center console, above the radio. The operator fabricated an aluminum bracket to get the radio control head to ride just forward and above the radio. This is, unfortunately, also where I keep my external speaker. More importantly, I cannot fabricate aluminum. Again, not an option.
3. Center console, just in front of the gear shift. This is where my FT-7900R control head was, and to be honest, I can't say that I liked looking down while driving to handle the basic tasks when using the radio. I got good at doing almost everything by feel, but I would still flick my eyes down to read the display sometimes. I didn't want to do that again, especially with the rich display that the FTM-400XD provides. Unfortunately, it wasn't an option.
I had to make up my own. I decided to install it just on top of my instrument cluster. Admittedly, it was a pain because of the ergonomics. Luckily, I've worked on boats before, so I have a few tricks to work in tight spaces. I also used self-tapping screws. Before long, I completed the installation. It looks great, it's out of my view when I don't want it. It's available when I do want it. It's not distracting. If you're going to install one of these, I highly recommend this location.
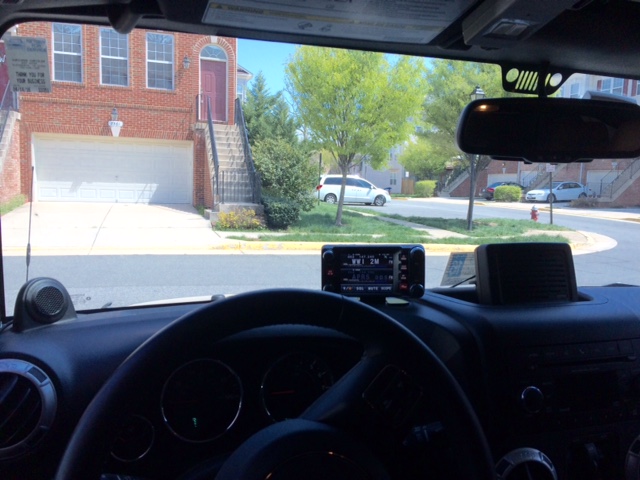
The control head, installed. Notice the external speaker on the right, and the antenna on the left.
An additional feature that I thought was pretty cool was Yaesu including an adapter for my external speaker. If you have an older external speaker, you need to use this due to the dual receive nature of the radio.
The feature that I was NOT happy about is the microphone connecting directly to the radio body vice the control head. On one hand, yes, it wouldn't make sense to connect it to the control head because pulling on the microphone would probably rip the head (which is very light) from whatever mounting surface it was on. On the other, they didn't include a microphone extension! The Yaesu microphone extension kit is $50. I'm pretty sure that I can build one for much cheaper using 6-pin RJ-12 and a coupler, so I'm going to go to Radio Shack or Wal-Mart later this week. What a pain!
Control Software
As of this writing, CHIRP did not support the FTM-400XD. However, Yaesu included the programming cable (USB-to-radio!) and you can download the software from their website. I installed it on Windows 10 on my Surface Pro 3.
The first problem happened when I tried to start the software. It just didn't open. For whatever reason, if this happens to you, right click on the file and select "Run as Administrator..." You have to select OK (or Continue, I can't remember) on a follow-up dialogue box, but the software starts.
You must download the image from the radio before you can upload it! This is a big deal! Do not download the image from the radio, upload it later, then work on it, and expect to be able to upload it again. I like to play with the settings on my computer in my nice warm house, especially when it is cold. I was not pleased that I had to redo all of the settings that I had changed in the house over Saturday night while sitting in the car on Sunday morning before church.
However, the software was simple to use, and I had the radio programmed the way I wanted it very quickly.
Using the FTM-400XD
The radio is an absolute pleasure to use. Initially, when I made the purchase, I was annoyed that I was paying for what I initially considered a gimmicky touchscreen. I have never been so wrong.
Some Internet reviewers complain that it is not like an iPhone. It is a touchscreen that requires a good tap, but it feels very robust. I really like the feel of it. It is visible from all angles, including when I wear my polarized sunglasses. It is very bright. Yaesu's human-machine interface guys did a great job when they designed the various workflows. It was a snap to operate the radio within minutes.
I don't know what they did in regards to discriminating against noise, but this radio does not react to interference like my FT-7900R did. It is much more pleasurable driving my morning commute without the sudden painful bursts of static. The SQL is turned pretty low, so I have no idea what the difference is, but I am very happy with it.
The sound is also "softer." It's easier to listen to a conversation with this radio through my external speakers.
The APRS functionality is amazing. I'll probably write about that separately, but its a ton of fun driving around and seeing the APRS beacons pop-up. It's also a ton more convenient. Today, I had a QSO where I initially missed the callsign, but his beacon immediately popped up so I got that (and a bunch of other information!).
Final Thoughts
This radio is fantastic. I highly recommend it to anyone who is even considering the switch. If you're less interested in honest dual receive and cross-band repeating, take a look at the FTM-100DR. But if you want the premium options, this is the radio for you.
If you have any questions about my installation, I'm happy to discuss it with you.
If you have any questions about my installation, I'm happy to discuss it with you.
 RSS Feed
